18 Oct 2025
openstack
kubernetes
presentation
Stephen and I introduced the OpenStack Resource Controller (ORC), a set of kubernetes CRDs and controller to manage OpenStack resources, at the 2025 OpenInfra Summit.
10 Oct 2021
hubtty
Part of my responsibilities at my day job involves reviewing other people’s
code. There can be a fairly large number of Pull Requests in many different
repositories that I need to monitor. In the past, while I was working on
OpenStack, I was quite fond of
Gertty to give
me a quick glance of the new PRs and help me spend my time better. I missed
this tool after I changed teams and most of the code reviews happened on Github
rather than Gerrit.
About a year ago, I decided to scratch my own itch and looked at how hard it
would be to port Gertty to the Github API and workflow. It turned out to not be
so difficult: Gertty is well designed and it’s a joy to work with its source
code. Hubtty was born.
Meet Hubtty
How Hubtty came to be
OK, so where do I start? How do I port Gertty from Gerrit to Github? A quick
look at the Github REST API tells me it should be possible to port most of the
Gertty’s features relatively easily. I considered for a minute using a python
library to talk to the Github API but rapidly put this idea aside as it would
mean rewriting a lot of the sync module: Gertty uses the requests library to
talk to the Gerrit REST API directly and I figured I could simply reuse the
same call, but with the Gitub API instead as the two APIs are more or less
compatible.
After experimenting a bit, I was quickly able to retrieve the list of PRs for
each repositories the user had subscribed to. Excited with this early success
I set myself a goal to send the first review from Hubtty before the end of the
year (it was November) which I barely
did.
At this time, Hubtty was still relying on an existing authorization token that
you had to create manually from the Github UI or “borrow” from another
application. Next step was to implement the device
flow
so that Hubtty could create Authorization tokens on the user’s behalf. This
part was
straightforward
but I realized it now forces the organizations to explicitely approve Hubtty
when they have enabled third-party application restrictions otherwise it
wouldn’t be able to submit reviews. This is still an
issue to this day.
After I started subscribing to more repositories I ran into issues with the
Github API rate limiting. The issue was rather obvious and quickly fixed.
A less obvious issue gave me a hard time and only manifested when I got back to
using Hubtty after some time – think PTO – where it would only sync part of the
PRs. It was an problem with how I handled the pagination for some queries,
leading to this nasty synchronization issue.
Another big part was to port the search syntax to the Github search. As of
today, I’ve implemented the most important search
operators and left out things we
do not yet synchronize with Hubtty.
Finally, I’ve also made Hubtty consistently use the Github terminology. For
example, it now uses Repository over Project (which means something
entirely different for Github), and Pull Request over Change to list the
most obvious. This was quite painful.
I used Hubtty as my inbox for PRs for the major part of this year and it was
getting more stable, to the point I’m no longer ashamed of recommending it to
others.
What it looks like now
On Friday I released the first version of Hubtty, v0.1. It has reached a state
where it has feature parity with Gertty, or close enough, and is also stable
enough to be used by other developers.
It’s available through the cheese shop, install it with:
Take a look:
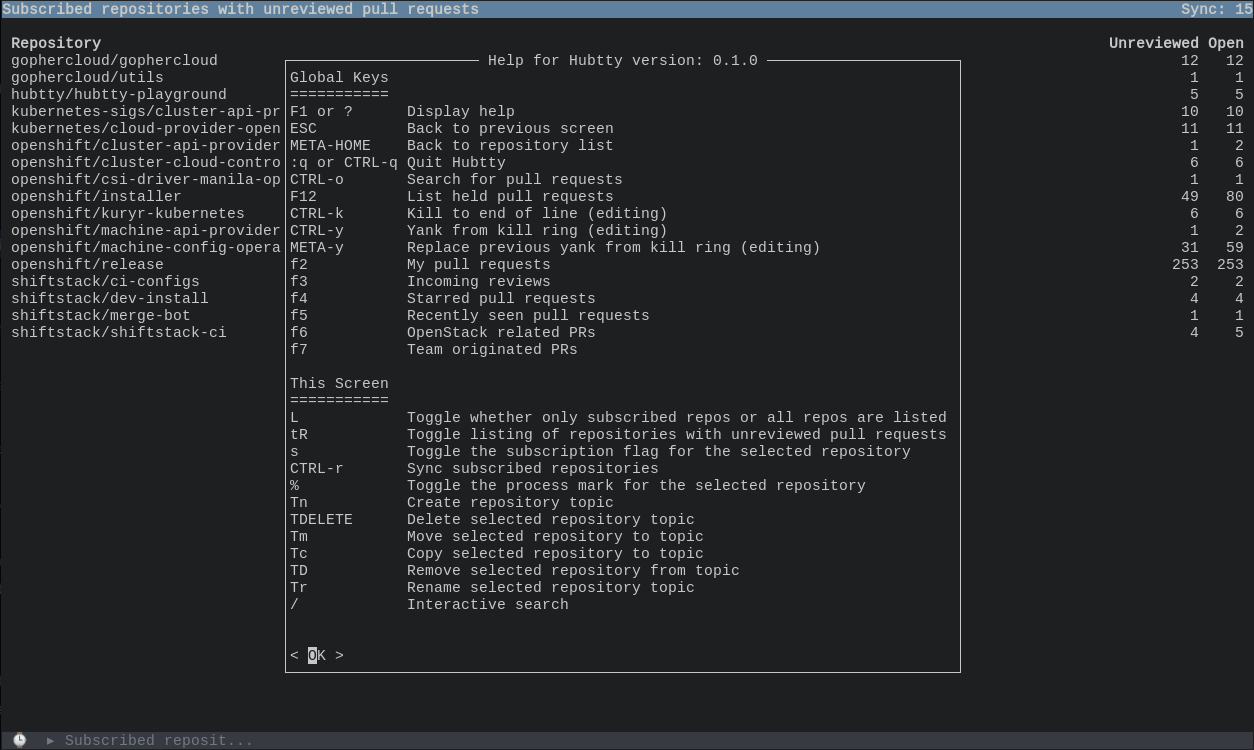
List of subscribed repositories

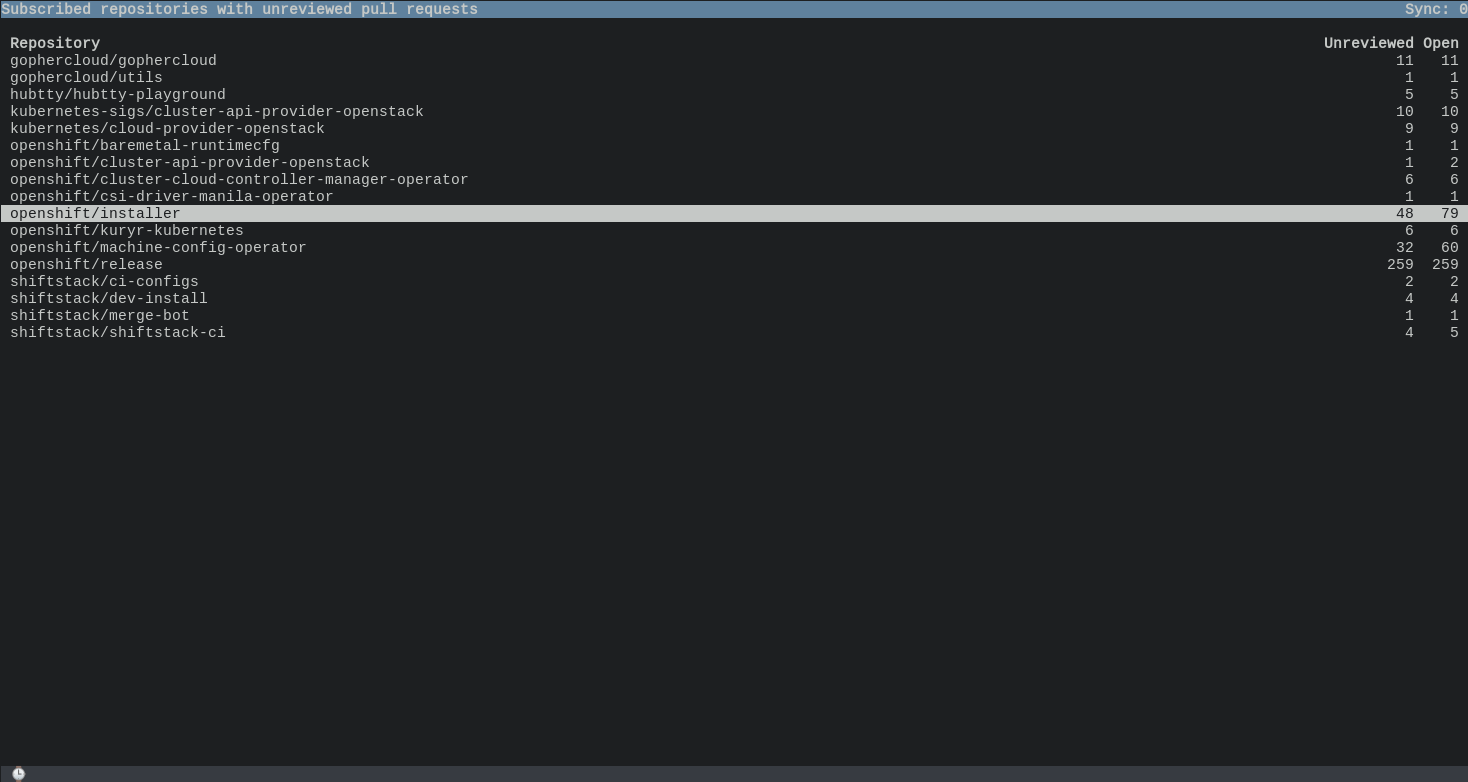
List of PRs in a subscribed repository
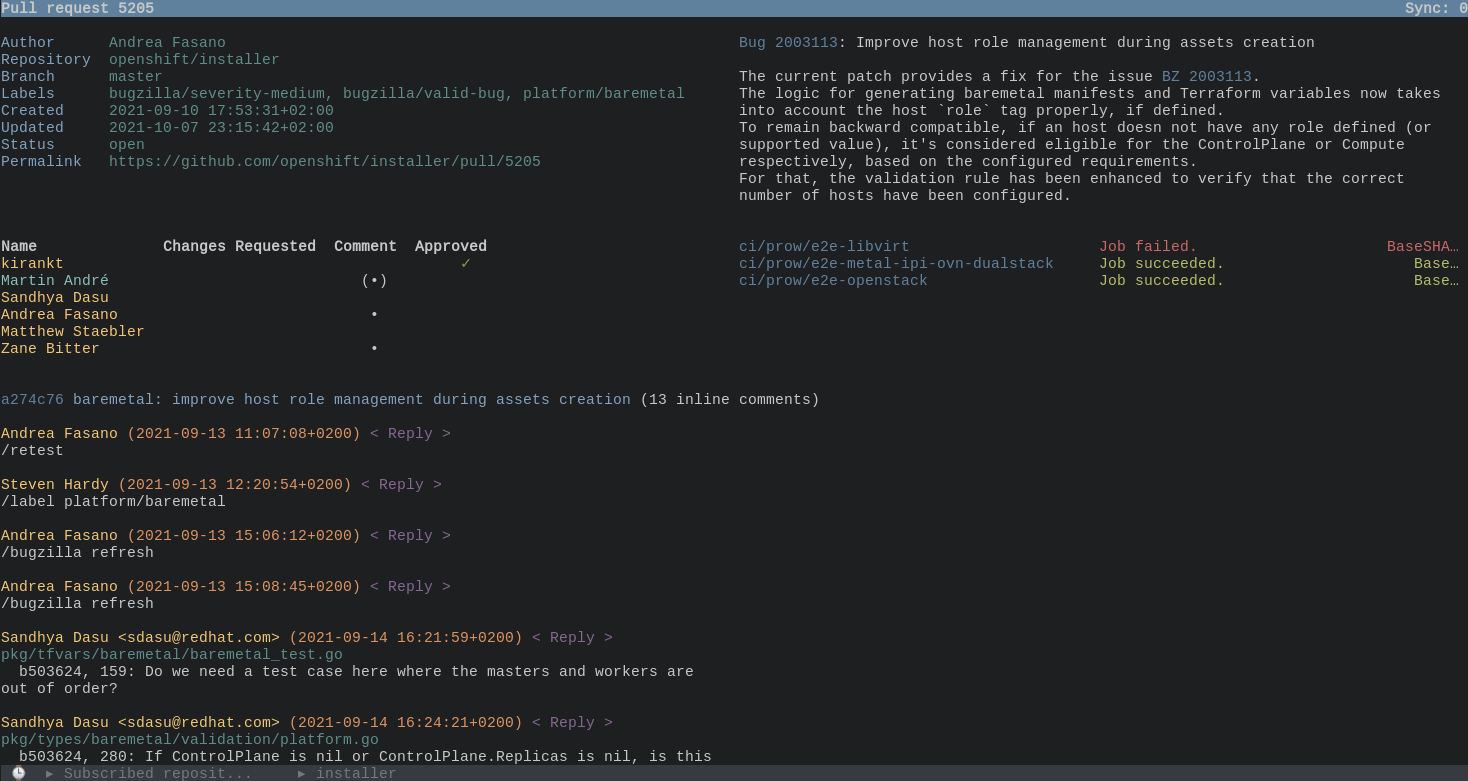
Opening a PR

Viewing code changes
Plans ahead
In the coming versions, I’d like to have it integrate better with the Github
features and improve UX. There is a lot to do, among other things:
- Markdown rendering
- Highlight PR with merge conflicts
- Highlight draft PRs
- Sync draft reviews
- Autocompletion for usernames
- Cherry-pick PRs
- Reactions
- …
I would also like to have hubtty packaged for the major distros. This should be
relatively straightforward considering gertty has already done the work for us.
I hope it’s going to be as useful to you as it is to me.
Test it, give feedback, and report issues and feature requests on the Github
project page.
Happy hacking!
27 Sep 2020
android
Today I got fed up with the stock Android ROM – and the lack of security
updates – that came with my tablet and decided to switch to a better
alternative.
The instruction for my device said to use
QFIL to flash
it. However, this is a Windows program and none of my computers run Windows.
The instruction had a few steps with the word important written in red
bold UPPERCASE, probably as a mean to discourage you experimenting and risk
bricking your device. The forum thread wasn’t also very helpful to provide
instruction for Linux.
A quick Internet search later, I was on the
qdl page
where the tool description says:
As open source tool (for Linux) that implements the Qualcomm Sahara and
Firehose protocols has been developed by Linaro, and can be used for program
(or unbrick) MSM based devices, such as Dragonboard 410c or Dragonboard 820c.
This seems like it! However, no mention of QPST or QFIL, the two tools I read
about earlier. I decided to trust the nice folks at Linaro and indeed, this was
exactly the tool that I needed.
As of today, there are no distribution packages available so we’ll have to
build from source:
$ git clone https://git.linaro.org/landing-teams/working/qualcomm/qdl.git
$ cd qdl
$ sudo dnf install libxml2-devel libudev-devel
$ make
When in EDL mode, the device identifies itself as a Qualcomm modem and we need
to turn off ModemManager to prevent it from interfering:
sudo systemctl stop ModemManager
From there, I would change to directory where I unzipped the
TWRP archive and run qdl:
$ sudo ./qdl/qdl --debug prog_emmc_firehose_8953_ddr.mbn rawprogram0.xml patch0.xml
Waiting for EDL device
After getting my device into EDL 9008 mode, in my case connecting it to my
computer while being powered off and holding the volume up button, qdl
noticed the device and started flashing it:
HELLO version: 0x2 compatible: 0x1 max_len: 1024 mode: 0
READ image: 13 offset: 0x0 length: 0x34
READ image: 13 offset: 0x34 length: 0x120
...
READ image: 13 offset: 0x53504 length: 0x720
END OF IMAGE image: 13 status: 0
DONE status: 0
qdl: failed to read: Connection timed out
FIREHOSE WRITE: <?xml version="1.0"?>
...
[PROGRAM] flashed "recovery" successfully at 15323kB/s
...
I could then follow the rest of the instruction and finish rooting my device.
After installing the custom ROM from TWRP and fixing a bootloop because
I stupidly forgot to install the gapps, I got
everything working and am ready to enjoy using my tabled again.
05 May 2019
kano
What is Kano?
Kano is a small educational Linux distribution to teach
computers to kids. Kano is great: if you have kids, definitely check it out.
It runs on a cheap Raspberry Pi, the system is
free. It’s perfect. Or almost… It’s only
available in English or Spanish and the company behind Kano, despite a few
promises in that sense, hasn’t yet made it available to other languages.
However because Kano is Open Source, meaning you can modify it to your liking,
we do not rely on them to provide us with localized builds to enjoy the distro
in another language. With a few tweaks, you can do it yourself. Here is how.
Make the system available in your language
Turn on your Kano computer and make sure it has network connectivity. Go to
Advanced and enable SSH. Then you can connect to it via SSH and change the
language of the system:
sudo dpkg-reconfigure locales
Select which locales you want to enable. For instance for French, I’m enabling
fr_FR.UTF-8. It’s usually a good idea to always build en_US.UTF-8.
On the next screen you’ll be able to select which locale will be the default one.
To make your change take effect, log out and log in again. If you don’t know
what that means, simply restart your Kano computer.
Now that you’re back in Kano you’ll notice that the interface is… still in
English. What happened? Didn’t we just changed the system locales? Yes we did.
In fact if you open an application such as the file browser or the calculator,
you’ll see it applied your language preference. These applications are
originated from the wider Open Source community and include translation files,
contrary to the Kano developed applications.
We need to create those files. This is where you can help.
Translating Kano applications
Translating software can be fun and doesn’t require any particular technical
knowledge. All the sentences or words from the original software are extracted
into a file that serves as a template for new translation files.
There are several services that allow translating files online. Transifex,
Pootle, and Zanata are among the most well known.
I took the liberty to upload the Kano template files to Zanata because it is
free and offers a public instance. So far, I’ve created translation projects for:
For these projects I uploaded the existing translation files I could find on
the Internet and started contributing French translations.
Create yourself an account,
join the projects, and start
translating.
Apply the changes
This is where it gets more complex. In an ideal world, the translation files
are included with the software and shipped with the next release. In this case
however, we’ll have to upload the files to the Kano computer. This location is
different for each soft.
For Make Snake
Clone the make-snake repository:
git clone git@github.com:KanoComputing/make-snake.git
Download the .po file, for example for
French,
and copy it to the po directory as fr.po. The file name has to match the
language code. Finally run make from the po directory:
Copy the resulting locale/fr/LC_MESSAGES/make-snake.mo file to
/usr/share/locale/fr/LC_MESSAGES/make-snake.mo on the Kano computer.
For Terminal Quest
For Terminal Quest, you’ll follow the same process:
git clone git@github.com:KanoComputing/terminal-quest.git
# Add the translated .po file to the po directory
cd po
make
Then copy the resulting terminal-quest.mo to
/usr/share/locale/YOUR_LOCAL/LC_MESSAGES/ on the Kano computer.
For Story Mode
Kano-overworld is a different beast. It’s a LÖVE
application built using the lua programming language.
The translation template comes from the kano-overworld-i18n-orig package, but
I have yet to figure a way to turn the translated .po files back into a lua
dict that the application expects. So what I did instead was to copy the
original language resource and edit it in place.
The “Story Mode” files live in
/usr/share/kano-overworld/build/kanoOverworld.love. It’s simply a zip
archive.
sudo apt-get install zip
mkdir kano-overworld
cd kano-overworld
unzip /usr/share/kano-overworld/build/kanoOverworld.love
cp -r res/locales/en_US/ res/locales/fr_FR/
vi res/locales/fr_FR/lang.lua
Then you can update the resources with:
zip -9 -r /usr/share/kano-overworld/build/kanoOverworld.love res/
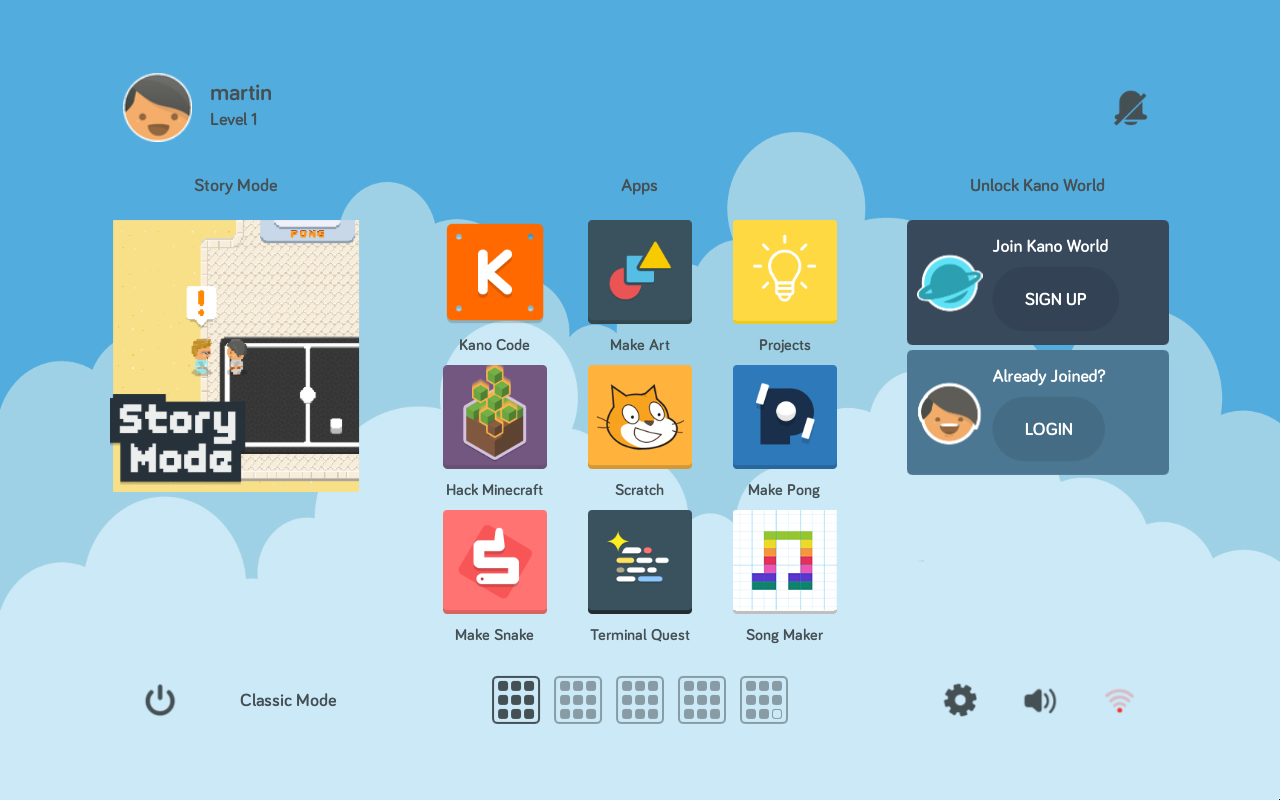
Here is how it looks in French:
And now what?
This is only the beginning. I’m hoping that people will jump on board and help
translate the Kano applications in their languages.
I’ll certainly push scripts to make this whole experience less hacky and make
is easier to update the distribution with the latest translations.
It’s a bit unfortunate the Kano developers don’t take i18n too seriously.
I understand they have business imperative and may not want to deal with
support for non-English users but that shouldn’t prevent them from sharing the
tools they use internally and make it easier for the community to provide
translation files.
Perhaps one day Kano – the company – will integrate these language files in
their projects and finally open Kano – the distribution – to more users?
28 Mar 2018
openstack
containers
The general case with kolla based containers
The configuration file is generally bind-mounted to a staging directory in the
container then copied via the
set_configs.py
script to the place as specified in /var/lib/kolla/config_files/config.json
file when the container starts. This means that changes to the config files on
the host will not affect the running containers, ensuring better isolation. You
would have to take a conscious decision and restart the container for the
config change to take effect. This is for example how Kolla-ansible and TripleO
proceed.
Say we want to bump the verbosity for the nova_scheduler service. In
a TripleO deployment, we would do:
$ sudo crudini --set /var/lib/config-data/puppet-generated/nova/etc/nova/nova.conf DEFAULT debug true
$ sudo docker restart nova_scheduler
Now we’re getting the DEBUG messages:
$ sudo grep DEBUG /var/log/containers/nova/nova-scheduler.log | wc -l
325
To revert back, we need to do the inverse change:
$ sudo crudini --set /var/lib/config-data/puppet-generated/nova/etc/nova/nova.conf DEFAULT debug false
$ sudo docker restart nova_scheduler
Reload config at runtime
Another – and better – option would be to take advantage of the oslo.config
mutable config
mechanism
that allows changing service settings at runtime. This has the big advantage
that we’re only changing the configuration in the container and we can easily
revert back by restarting the container.
Toggling the debug option at runtime was accepted as a community goal for
Rocky
meaning that all services should support it in the near future. This is already
the case for nova to let’s see how it works in practice to turn debug on with
our previous nova_scheduler example. This time, we’re editing the config file
directly in the container and send it a signal telling it to reload the
configuration:
$ sudo docker exec -u root nova_scheduler sed -ie 's/^[# ]*debug=false/debug=true/I' /etc/nova/nova.conf
$ sudo docker kill -s SIGHUP nova_scheduler
After we’re done debugging, turning the log severity back to normal is just
a matter of restarting the container:
$ sudo docker restart nova_scheduler
